Linux Mint(Ubuntu)でパッケージリストをバックアップする
バックアップ。
$ sudo dpkg --get-selections > /home/user/package.selections
リストア。
$ sudo dpkg --set-selections /home/user/package.selections && apt-get dselect-upgrade
みたいな感じ。
ここからコピペしました。
新規インストールしたUbuntuに前と同じパッケージのインストールをする方法 - ケーズメモ
バックアップはこんな感じでやっている。
alias backup_mint='time sudo rsync -au --delete /home/tomoki/ "/media/tomoki/Transcend/Linux Mint 18 backup/tomoki" && dpkg --get-selections > "/media/tomoki/Transcend/Linux Mint 18 backup/package.selections"'
Sinatra で Code Viewer を作る(Ruby)
code_viewer.rb
require 'sinatra'
require 'sinatra/reloader'
require 'rouge'

set :bind, '192.168.11.150'
set :port, 16524

suffixes = {"rb" => "Ruby", "html" => "HTML", "css" => "CSS", "erb" => "ERB", "c" => "C",
  "cpp" => "Cpp", "py" => "Python", "go" => "Go"}
types = %W(Base16 Colorful Github Gruvbox IgorPro Molokai Monokai MonokaiSublime Pastie ThankfulEyes Tulip)
type_num = 3

formatter = Rouge::Formatters::HTML.new

handle_dir = ->(dname) {
  dirs = []
  files = []
  Dir.chdir(dname)
  Dir.glob("*").sort.each do |fname|
    if File.directory?(fname)
      dirs << [fname, handle_dir.(fname)]
    else
      m = /\.(.*)/.match(fname)
      m = m ? m[1] : ""
      sf = suffixes[m] || "PlainText"
      lexer= eval("Rouge::Lexers::" + sf).new
      html = formatter.format(lexer.lex(File.read(fname))) rescue next
      files << [fname, html]
    end
  end
  Dir.chdir("..")
  {:dirs => dirs, :files => files}
}
sources = handle_dir.("user_codes")

get '/' do
  @sources = sources
  @css_types = types
  @type_num = type_num
  erb :index
end

post '/' do
  type_num = params[:css_style].to_i
  redirect '/'
end

make_page = ->(h, path) {
  h[:dirs].each {|d| make_page.(d[1], path + d[0] + '/')}
  h[:files].each do |f|
    get path + f[0] do
      @html = f[1]
      @css_name = types[type_num].downcase
      erb :render
    end
  end
}
make_page.(sources, "/")
ディレクトリ views 内
index.erb
<!DOCTYPE html>
<html lang="ja">
<meta http-equiv="Content-Type" content="text/html; charset=UTF-8">
<title>Code Viewer</title>
<head>
</head>
<body>

<h1>Code Viewer</h1>

<form method="post">
<p>CSS Style
 <select name="css_style">
<% @css_types.each_with_index do |ty, i| %>
<option value="<%= i %>"><%= ty %></option>
<% end %>
</select> <input type="submit" value="選択">
 <span style="color: blue;"><%= @css_types[@type_num] %></span></p>
</form>

<% def handle(h, path) %>
<ul>
  <% h[:dirs].each do |d| %>
<li><%= d[0] %></li>
    <% handle(d[1], path + '/' + d[0]) %>
  <% end %>
  <% h[:files].each do |f| %>
<li><a href="<%= path + '/' + f[0] %>" style="color: green;"><%= f[0] %></a></li>
  <% end %>
</ul>
<% end %>

<% handle(@sources, "") %>

</body>
</html>
render.erb
<!DOCTYPE html>
<html lang="ja">
<meta http-equiv="Content-Type" content="text/html; charset=UTF-8">
<title>Code Viewer</title>
<head>
<link rel="stylesheet" type="text/css" href="/css/<%= @css_name %>.css">
<style type="text/css">
pre.highlight {
  font-family: Courier New, Consolas, monospace;
  font-size: 100%;
  padding: 10px;
  line-height: 1.1em;
  white-space: pre-wrap;
}
</style>
</head>
<body>

<pre class="highlight">
<%= @html %>
</pre>

</body>
</html>
Windows 8.1 に iTunes が再インストールできない
前もあったのでメモしておく。
コントロールセンターから以下のプログラムを、この順にアンインストールする。
- iTunes
- Apple Software Update
- Apple Mobile Device Support
- Bonjour
- Apple Application Support (32 ビット)
- Apple Application Support (64 ビット)
(実際はエラーが出てこの順にできなかったが、別に大丈夫だった。)
あとは、ダウンロード・フォルダの「**setup.exe」みたいなファイルを、右クリックして管理者として実行する。
※参考
iTunes for Windows をインストールまたはアップデートできない場合 - Apple サポート
Windows 7 以降で iTunes とその関連ソフトウェアコンポーネントを削除して再インストールする - Apple サポート
rbenv でバージョンを上げたときの注意(Ruby)
Gem が一切インストールされていないことになるので、該当ディレクトリで
$ rbenv exec gem install bundler
$ bundle install
を実行。全 Gem が再インストールされる。
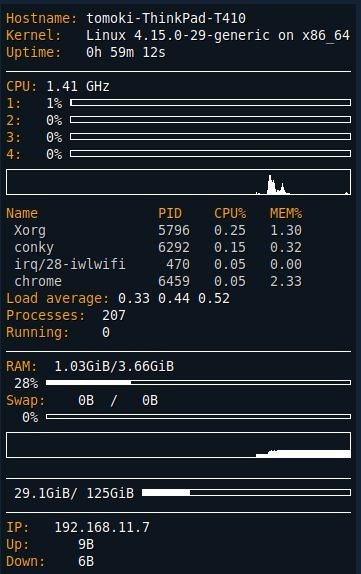
.conkyrc 設定メモ
基本的にここの設定を使わせてもらいました。ありがとうございます!
コンフィグ設定と変数設定。
https://github.com/brndnmtthws/conky/wiki/Configuration-Settings
https://github.com/brndnmtthws/conky/wiki/Configuration-Variables
conky.config = {
  use_spacer = 'left',
  pad_percents = 3,
  background = true,
  double_buffer = true,
  font = 'DejaVu Sans Mono:size=10',
  use_xft = true,
  alignment = 'top_right',
  gap_x = 10,
  gap_y = 40,
  own_window_argb_visual = true,
  own_window_argb_value = 100,
  own_window_type = 'desktop',
  own_window = true,
  update_interval = 5.0,
}

conky.text = [[
${color orange}Hostname: ${color}${nodename}
${color orange}Kernel:   ${color}${sysname} ${kernel} on ${machine}
${color orange}Uptime:   ${color}${uptime}
${hr}
${color orange}CPU:${color} ${freq_g} GHz
${color orange}1:${color} ${cpu cpu1}% ${cpubar cpu1}
${color orange}2:${color} ${cpu cpu2}% ${cpubar cpu2}
${color orange}3:${color} ${cpu cpu3}% ${cpubar cpu3}
${color orange}4:${color} ${cpu cpu4}% ${cpubar cpu4}
${cpugraph}
${color orange}Name               PID    CPU%   MEM%
${color lightgrey} ${top name 1} ${top pid 1} ${top cpu 1} ${top mem 1}
${color lightgrey} ${top name 2} ${top pid 2} ${top cpu 2} ${top mem 2}
${color lightgrey} ${top name 3} ${top pid 3} ${top cpu 3} ${top mem 3}
${color lightgrey} ${top name 4} ${top pid 4} ${top cpu 4} ${top mem 4}
${color orange}Load average: ${color}${loadavg}
${color orange}Processes: ${color}${processes}
${color orange}Running:${color} ${running_processes}
${hr}
${color orange}RAM:  ${color}${mem}/${memmax}
${memperc}% ${membar 4}
${color orange}Swap: ${color}${swap}/${swapmax}
${swapperc}% ${swapbar 4}
${memgraph}
${hr}
${color orange} ${color}${fs_used /}/${fs_size /} ${fs_bar 6 /}
${hr}
${color orange}IP:   ${color}${addr wlp3s0}
${color orange}Up:   ${color}${upspeed wlp3s0}
${color orange}Down: ${color}${downspeed wlp3s0}
]]
こんな感じ。
Linux の Shutter の「編集」ができない

Linux のスクリーンショットを撮るソフトに Shutter というものがありますが、Linux Mint 18.3 で使ってみようとしたところ、「編集」の機能が使えなかったので調べてみました。
How To Fix Disabled Edit Option In Shutter in Ubuntu 18.04 & Mint 19
基本的にこのサイトに書いてあります。一応ここでも記しておきましょう。
Shutter は古いライブラリを使っているとのことなので、Synaptic から
libgoocanvas-common, libgoocanvas3, libgoo-canvas-perl
の各パッケージをインストールします。そして、Shutter を立ち上げていたのなら
$ sudo killall shutter
が必要かもしれません。で、ログアウトして再びログインすれば、Shutter の「編集」が使えるようになっている筈です。
なお、ウェブページのスクリーンショットを撮る機能は、Synaptic で「gnome-web-photo」をインストールする必要があるようです。
Lubuntu 18.04 をインストール

ダウンロードはここから。Torrent を使うと速くダウンロードできます。
インストールは特にむずかしいことはなし。ここなどを参考にして下さい。先にネット接続をしておいて、必要なソフトを自動でダウンロード&インストールしてくれるようにしておくとよい。サイズの小さいディストリビューションなので、インストールは比較的早く終わる。
まずはアップデート。
$ sudo apt update
$ sudo apt upgrade
ホームフォルダの日本語名を英語に直す。
$ env LANGUAGE=C LC_MESSAGES=C xdg-user-dirs-gtk-update
日本語入力は何もしなくても fcitx-mozc が使えるようだ。
Firefox から Google Chrome のインストール。パッケージインストーラーでうまくインストールできなかったら、/tmp/mozilla_***/ というフォルダに Chrome がダウンロードされているので、ファイルマネージャで開いて [右クリック]→[ソフトウェアのインストール] でインストールできる。
パネルを好きにカスタマイズする。自分は Leafpad や LXTerminal、Chrome などを追加しておいた。
全体としてあまりカスタマイズの余地はない。そういうことがしたい人はちがうディストリビューションを選びましょう。Lubuntu はシンプル(昔の Windows に似ている)でサクサク動くことは確か。
Ruby をインストールする。
Linux Mint に rbenv で Ruby を入れる - Camera Obscura
「ソフトウェア」から Geany をインストール。
Ubuntu に Ruby/SDL を入れる
インストール
まずはライブラリを入れる。
$ sudo apt-get install libsdl2-2.0 libsdl-sge-dev
Bundler で Gem 'rubysdl' を入れる。
何か Gem の場所がわからない。
$ bundle exec gem which sdl
/home/tomoki/.rbenv/versions/2.3.4/lib/ruby/gems/2.3.0/gems/rubysdl-2.2.0/lib/sdl.rb
サンプルを実行してみる。
$ cd ~/.rbenv/versions/2.3.4/lib/ruby/gems/2.3.0/gems/rubysdl-2.2.0/sample
$ ruby testsprite.rb
$ ruby testgl.rb
$ ruby movesp.rb
OK ですね!
Ruby/SDL はもうメンテされていないようだけれども、ちゃんと動くではないか。
SGE(SDL Graphics Extension)
$ sudo apt-get install libsdl-sge-dev
これをやってから rubysdl を入れないと、使えないメソッドがいろいろある。
赤い円を描いてみる。
require 'sdl'

SDL.init(SDL::INIT_VIDEO)
screen = SDL::Screen.open(300, 300, 16, SDL::SWSURFACE)
SDL::WM::set_caption("SDL", "")

red   = screen.format.map_rgb(255,   0,   0)
white = screen.format.map_rgb(255, 255, 255)

screen.draw_rect(0, 0, 300, 300, white, true)
screen.draw_circle(150, 150, 150, red, true, true)

screen.flip

loop do
  while event = SDL::Event.poll
    case event
    when SDL::Event::KeyDown, SDL::Event::Quit
      exit
    end
  end
  sleep 0.2
end
線が移動していくアニメーション。
require 'sdl'

def draw(&blk)
  SDL.init(SDL::INIT_VIDEO)
  screen = SDL::Screen.open(300, 300, 16, SDL::SWSURFACE)
  SDL::WM::set_caption("SDL", "")

  class << screen
    def color(r, g, b)
      format.map_rgb(r, g, b)
    end
  end

  Thread.new {screen.instance_eval(&blk)}

  loop do
    while event = SDL::Event.poll
      case event
      when SDL::Event::KeyDown, SDL::Event::Quit
        exit
      end
    end
    sleep 0.2
  end
end

draw do
  green = color(  0, 255,   0)
  white = color(255, 255, 255)

  draw_rect(0, 0, 300, 300, white, true)

  300.times do |x|
    draw_line(x, 0, 299 - x, 299, green, true)
    flip
    sleep(0.05)
  end
end
SDL::TTF
フォント描画。

Linux Mint 18.3 の TakaoExMincho.ttf を使ってみる。
sdl_sample5.rb
require_relative 'sdl_draw'

draw(300, 150) do
  SDL::TTF.init
  font = SDL::TTF.open("/usr/share/fonts/truetype/takao-mincho/TakaoExMincho.ttf", 40)
  font.draw_solid_utf8(self, "Ruby", 10, 10, 0, 255, 255)
  font.draw_blended_utf8(self, "Ruby", 10, 50, 0, 255, 0)
  font.draw_blended_utf8(self, "岐阜", 10, 100, 255, 0, 0)
  flip
  font.close
end
ちゃんと漢字も描画可能だ。draw_solid_utf8() よりも draw_blended_utf8() の方がアンチエイリアスが効いていたりして、きれいである。
sdl_draw.rb は描画の定型を簡単にライブラリ化したもので、ここを参照。

require_relative 'sdl_draw'

draw(300, 100) do
  fill_rect(0, 0, 300, 100, color(255, 255, 255))

  SDL::TTF.init
  font = SDL::TTF.open("/usr/local/share/fonts/CHEESE__.TTF", 40)
  font.draw_blended_utf8(self, "Ruby/SDL", 47, 30, 0, 0, 0)
  flip
  font.close
end

#Font: http://www.cfont.jp/bitmap/cheese.html
SDL::Kanji
bdfフォントで漢字を使ってみる。

まず bdfフォント(いまでは一般的でない)を入手しなければならない。例えばここが参考になります。自分は東雲 ビットマップフォントファミリーを使わせて頂きました。ダウンロードはここから。これを解凍して、適当な場所に置きます。
コード。
sdl_sample4.rb
require_relative 'sdl_draw'

Dir.chdir("/home/tomoki/Documents/shinonome-0.9.11/bdf/")

draw(300, 300) do
  ["shnmk16", "shnmk16b", "shnmk16min", "shnmk16minb"].each_with_index do |font, i|
    kanji = SDL::Kanji.open(font + ".bdf", 16)
    ["Ruby", "ルビイ", "浅野"].each_with_index do |text, j|
      kanji.put(self, text, 10, i * 70 + j * 20, 255, 255, 0)
      flip
      sleep(0.5)
    end
    kanji.close
  end
end
SDL::TTF できれいに漢字が描画できるので、わざわざ SDL::Kanji を使う必要はあまりないだろう。懐かしさを体験してみるとか。

require_relative 'sdl_draw'

Dir.chdir("/home/tomoki/Documents/shinonome-0.9.11/bdf/")

draw(300, 100) do
  ["shnmk12min", "shnmk12maru", "shnmk12p"].each_with_index do |font, i|
    kanji = SDL::Kanji.open(font + ".bdf", 12)
    kanji.put(self, "魔法の杖を手に入れた!", 10, i * 20 + 15, 0, 255, 0)
    flip
    sleep(0.5)
    kanji.close
  end
end
SDL::BMFont
ビットマップフォントを使ってみる。

フォントは SFont 形式を使った。ダウンロード、解凍して適当な場所に置く。
sdl_sample6.rb
require_relative 'sdl_draw'

Dir.chdir("/home/tomoki/Documents/SFont-2.03")

draw(300, 150) do
  fill_rect(0, 0, 300, 150, color(0xe7, 0xfc, 0xb5))

  flag = SDL::BMFont::TRANSPARENT | SDL::BMFont::SFONT

  font = SDL::BMFont.open("24P_Arial_NeonYellow.png", flag)
  font.textout(self, "Ruby", 10, 10)
  font.close

  font = SDL::BMFont.open("24P_Copperplate_Blue.png", flag)
  font.textout(self, "SDL", 10, 50)
  font.close

  flip
end
SFont だと色も使えないし大きさも選べない上に、ASCIIコードしか表示できない。あまり使い道はなさそう。
ネット上の Sinatra 掲示板サンプルコードを動かしてみる(Ruby)

yharaさんの作られたサンプル。
https://github.com/yhara/sinatbbs
Sqlite3 が必要なので入れる。
$ sudo apt-get install sqlite3 libsqlite3-dev
git clone。
$ git clone git://github.com/yhara/sinatbbs.git
実行。「bundle exec」が面倒なら「start.rb」に「require "bundler/setup"」を追加。
$ cd sinatbbs
$ bundle install
$ ruby start.rb
ブラウザでhttp://localhost:4567/をアクセス。
※技評での連載
第9回 SinatraとSequel・Hamlで掲示板アプリを作る:Ruby Freaks Lounge|gihyo.jp … 技術評論社